Next.js에서 jest를 적용해서 테스트 코드를 작성해보자
2024.09.12 17:22
Overview
프론트엔드 환경에서 테스트 코드를 작성한 경험이 한 번도 없어 이번에 이미 만들어진 코드를 베이스로 시도해보기로 했다. (TDD 개발이었다면 테스트 코드를 작성하고 개발해야하지만 일단 넘어가자)
대상은 현재 NextJs로 만들어진 내 블로그에 적용해보기로 했다.
환경
- PackageManager: npm
- Next: 14.2.8
Getting Started
- Next 프로젝트를 생성하기 전이라면 아래 명령을 통해 간단하게 셋팅할 수 있다고 한다.
npx create-next-app@latest --example with-jest with-jest-app
하지만 나는 이미 next 프로젝트를 생성해서 내 블로그를 작업했으므로 수동으로 설정해줘야 한다.
Manual setup
# 필요한 라이브러리 설치

npm install -D jest jest-environment-jsdom @testing-library/react @testing-library/dom @testing-library/jest-dom
# jest initializing

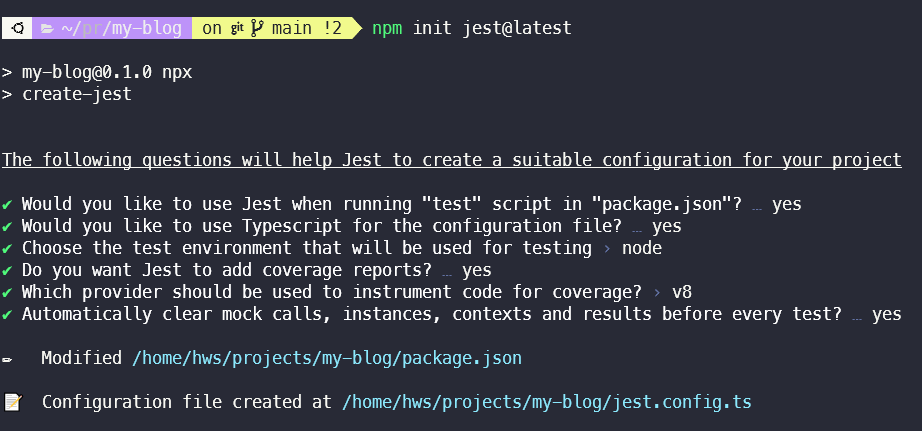
npm init jest@latest
jest init 할 때 여러 선택란이 주어지는데 나는 다음과 같이 설정했다. 안맞으면 수동으로 바꾸지 뭐 (참고로 environment 설정은 나중에 config 파일에서 jsdom으로 수동으로 변경했다ㅋㅋㅋ)

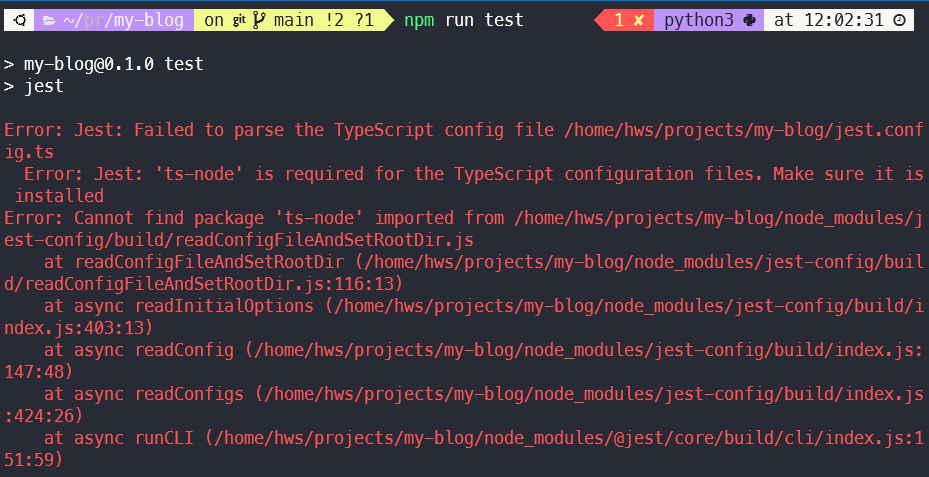
호기롭게 "좋았어! package.json에 jest로 test 명령도 추가됬겠다 한 번 돌려보자!" 하고 돌렸더니 터졌다.

다행히 아래 명령을 통해 ts-node 패키지 하나 설치해주니 테스트가 동작했다.
npm install ts-node --save-dev

Config Settings
tsconfig.json에 다음 부분을 추가하는 것을 잊지말자. 추가 안하니까 전역에서 jest를 인식하지 못했다.
// tsconfig.json

{
  "compilerOptions": {
    ...
    "types": [
      "jest",
      "node"
    ]
    ...
  },
  ...
}
jest.config.ts도 Next 공식 사이트의 해당 설정을 참고하며 수정했다. 참고
// jest.config.ts

import type { Config } from 'jest'
import nextJest from 'next/jest.js'

const createJestConfig = nextJest({
  // Provide the path to your Next.js app to load next.config.js and .env files in your test environment
  dir: './',
})

// Add any custom config to be passed to Jest
const config: Config = {
  coverageProvider: 'v8',
  testEnvironment: 'jsdom',
  setupFilesAfterEnv: ['<rootDir>/jest.setup.ts', '@testing-library/jest-dom'],
}

// createJestConfig is exported this way to ensure that next/jest can load the Next.js config which is async
export default createJestConfig(config)
그리고 이 친구도 미리 설치하자. 안하니까 type을 인식 못해서 시뻘겋더라..
npm install --save-dev @types/jest
그리고 eslint에서 에러가 잡힐 수 있기 때문에 .eslintrc에도 살포시 jest 환경을 추가해줬다. (아오 뭐가 많네;;)
// .eslintrc.json

{
  ...
  "env": {
    "jest": true
  },
  ...
}
됬다 여기까지 왔으면 얼추 기본 설정은 끝났다. 이제는 테스트 코드를 작성해보자.
테스트 코드 작성
간단한 단위 테스트 코드 구현을 위해 내 블로그의 navigation.tsx 컴포넌트의 기능이 제대로 동작하는지 테스트 하기 위한 코드를 작성했다.
해당 코드는 다음 기능을 검증한다.
- Home, Blog 텍스트를 가지는 링크가 존재하는가
- Home 링크는 '/'로 이동하는가
- Blog 링크는 '/posts'로 이동하는가
- 테마 버튼을 클릭하면 다크/라이트 모드 전환이 되는가
// __tests__/components/layout/navigation.test.tsx

import '@testing-library/jest-dom';

import { render, screen, fireEvent } from '@testing-library/react';
import Navigation from '@components/layout/navigation';
import { useTheme } from 'next-themes';
import { usePathname } from 'next/navigation';
import React from 'react';

// next-themes mocking
jest.mock('next-themes', () => ({
  useTheme: jest.fn(),
}));

// next/navigation usePathname mocking
jest.mock('next/navigation', () => ({
  usePathname: jest.fn(),
}));

// next/link mocking - 자식 요소를 <a> 태그로 감싸도록 처리
jest.mock('next/link', () => {
  return ({ href, children }: { href: string; children: React.ReactNode }) => (
    <a href={href}>{children}</a>
  );
});

describe('Navigation', () => {
  it('Home, Blog 링크가 존재', () => {
    // pathname을 '/'로 반환
    (usePathname as jest.Mock).mockReturnValue('/');

    // 현재 테마를 'light'로 반환
    (useTheme as jest.Mock).mockReturnValue({
      theme: 'light',
      setTheme: jest.fn(),
    });

    // Navigation 렌더링
    render(<Navigation />);

    // 텍스트 Home이 존재하는가
    expect(screen.getByText('Home')).toBeInTheDocument();
    // 텍스트 Blog가 존재하는가
    expect(screen.getByText('Blog')).toBeInTheDocument();
  });

  it(`Home 링크 클릭하면 '/'로 이동`, () => {
    // pathname을 '/'로 반환
    (usePathname as jest.Mock).mockReturnValue('/');

    // 현재 테마를 'light'로 반환
    (useTheme as jest.Mock).mockReturnValue({
      theme: 'light',
      setTheme: jest.fn(),
    });

    // Navigation 렌더링
    render(<Navigation />);

    // 텍스트가 Home인 link의 href attribute가 '/'로 설정되있는가
    const homeLinkElement = screen.getByRole('link', {
      name: /Home/i,
    });
    expect(homeLinkElement).toHaveAttribute('href', '/');
  });

  it(`Blog 링크 클릭하면 '/posts'로 이동`, () => {
    // pathname을 '/'로 반환
    (usePathname as jest.Mock).mockReturnValue('/posts');

    // 현재 테마를 'light'로 반환
    (useTheme as jest.Mock).mockReturnValue({
      theme: 'light',
      setTheme: jest.fn(),
    });

    // Navigation 렌더링
    render(<Navigation />);

    // 텍스트가 Blog인 link의 href attribute가 '/posts'로 설정되있는가
    const blogLinkElement = screen.getByRole('link', {
      name: /Blog/i,
    });
    expect(blogLinkElement).toHaveAttribute('href', '/posts');
  });

  it('테마 버튼 클릭하면 다크 모드로 전환', () => {
    const setThemeMock = jest.fn();

    // pathname을 '/'로 반환
    (usePathname as jest.Mock).mockReturnValue('/');

    // 현재 테마를 'light'로 반환
    (useTheme as jest.Mock).mockReturnValue({
      theme: 'light',
      setTheme: setThemeMock,
    });

    // Navigation 렌더링
    render(<Navigation />);

    // 테마 전환 버튼 클릭
    const button = screen.getByRole('button');
    fireEvent.click(button);

    // 'dark'가 반환되어 다크 모드로 전환되었는지 확인
    expect(setThemeMock).toHaveBeenCalledWith('dark');
  });

  it('테마 버튼 클릭하면 라이트 모드로 전환', () => {
    const setThemeMock = jest.fn();
    // pathname을 '/'로 반환
    (usePathname as jest.Mock).mockReturnValue('/');

    // 현재 테마를 'light'로 반환
    (useTheme as jest.Mock).mockReturnValue({
      theme: 'dark',
      setTheme: setThemeMock,
    });

    // Navigation 렌더링
    render(<Navigation />);

    // 테마 전환 버튼 클릭
    const button = screen.getByRole('button');
    fireEvent.click(button);

    // 'light'가 반환되어 라이트 모드로 전환되었는지 확인
    expect(setThemeMock).toHaveBeenCalledWith('light');
  });
});
테스트 결과
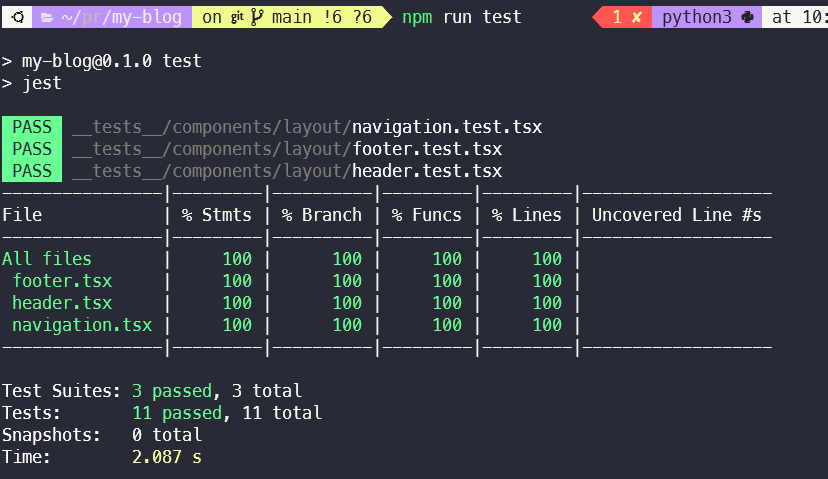
npm run test
test 명령을 수행하여 다음과 같은 결과를 얻을 수 있었다.

후기
지금은 이미 개발된 컴포넌트를 기반으로 테스트 코드를 작성해서 실행해봤다.
여기서 내가 느낀 점은 "어렵다. TDD로 개발하면 이런 테스트 코드를 어떻게 먼저 작성하고 실제로 개발하지?" 였다.
난 TDD에 공감이 잘 가지 않는 편이라 TDD가 무조건적으로 좋다라기보단 상황에 맞게 적용하는게 맞는 것 같다.
각 기능별로 컴포넌트를 개발하고나서 테스트 코드를 작성해서 실제 제대로 기능하는지 검증하는 용도로는 좋은 것 같다.
Reference
- https://nextjs.org/docs/pages/building-your-application/testing/jest
- https://jestjs.io/docs/getting-started